KERATOMETRY OR OPHTHALMOMETER
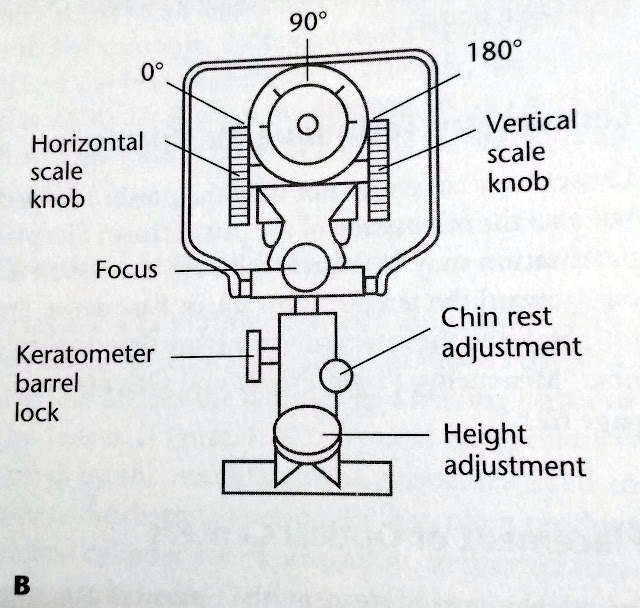
Performed with a device called a keratometer or ophthalmometer, keratometry is the measurement of a patient's corneal curvature. As such, it provides an objective, quantitative measurement of corneal astigmatism, measuring the curvature in each meridian as well as the axis. Keratometry is also helpful in determining the appropriate fit of contact lenses. Components of a typical keratometer are illustrated in Fig 1.1. The box "Performing Keratometry" describes the procedure for obtaining measurements with this instrument.
PERFORMING KERATOMETRY:
1. Looking through the eyepiece of the keratometer, use the eyepiece to focus the reticle(cross hair) in the same way as for the lensmeter.
2. Adjust the height of the keratometer table or platform so that the patient can comfortably put the chin and forehead on the appropriate rests.
3. Instruct the patient to place the forehead and chin firmly against the rests. Use the occluder attached to the keratometer to cover the eye not being measured.
4. Use the instrument's chin-rest adjustment knob to position the keratometer to the patient's eye roughly in line with the keratometer barrel. Then use the height adjustment knob of the keratometer to position the light reflections at the level of the cornea. Swivel the instrument horizontally to align with the patient's eye. These actions should both make the patient comfortable at the instrument and bring the light reflections from the keratometer into the patient's cornea.
5. Ask the patient to look into the barrel of the instrument for a reflection of the eye or at a fixation light if one is used.
6. Look through the eyepiece and use the focus knob to focus on the general area of the eye.
7. Lock the keratometer barrel when you see three circles through the eyepiece, which represent reflections from the patient's eye.
Steps 1 through 7 may need to be repeated during the remainder of the procedure to readjust the instrument.
8. Further align the keratometer with the eye by raising or lowering the keratometer by means of the height-adjustment knob and horizontal-swiveling capability until the reticle is in the center of the bottom-right circle (Figure A).
9. To obtain proper focus, rotate the focus knob until the bottom-right circles converge to form a fused image (Figure B)
10. Finding the axis is critical when taking an exact measurement. To locate the proper axis, rotate the keratometer until the pluses between the two bottom circles are in the same plane. (Figure C)
11. With the horizontal scale knob on the left, the pluses between the circles can be moved and aligned (Figure D). Some keratometers have different mires. Check with your doctor or read the instruction manual that came with the keratometer.
12. With the vertical scale knob on the right, the minuses between the circles can be moved until they align (Figure E)
13. Often it is not possible to obtain good readings in the vertical meridian using the minuses for alignment. In this case, the keratometer should be rotated 90*, and the pluses aligned using the horizontal scale knob, as described in step 11.
A proper measurement can be obtained when the following four conditions are met simultaneously.
1. The reticle is in the center of the bottom-right circle.
2. The keratometer is focused with fusion of the bottom-right circles.
3. The pluses between the circles are in the same plane and are fused.
4. The minuses between the circles are in the same plane and are fused.
You may need to readjust one or all of the control knobs until every element of proper measurement is obtained. In addition, it is critical that the eye-piece be properly focused at the start of the procedure.
RECORDING KERATOMETRY MEASUREMENTS:
Figure F illustrates a possible measurement of an astigmatic cornea. This information can be recorded in one of three ways described in figure.


Comments
Post a Comment